The Art and Science of Home-based Small Wind Tunnel Testing: The Beautiful Flow Physics
August 24, 2025
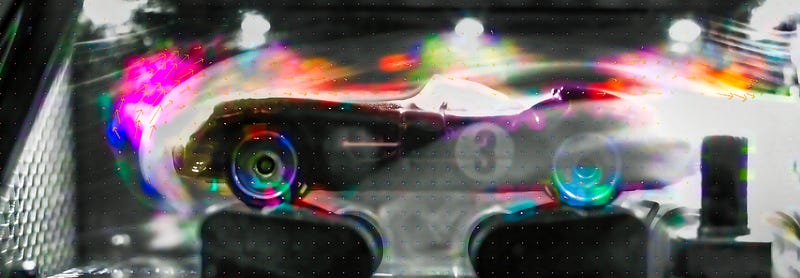
This week I set up a small wind tunnel at home to visualize airflow with smoke — honestly, it’s one of the most beautiful sights you can watch. I ran the flow over a tiny die-cast car with the wheels actually spinning, then used optical flow to extract velocity vectors and SINDy for analysis. This was just for fun, not a professional setup — no camera stabilization, no masking, nothing fancy. Watch the full video below!
The Equipment Breakdown
- 💨 Small smoke flow visualization wind tunnel (Fun-Tech-Lab)
- 🏎️ 1:64 scale car model with rotating wheels
- 📷 Sony A7III camera with manual focus for high-quality capture
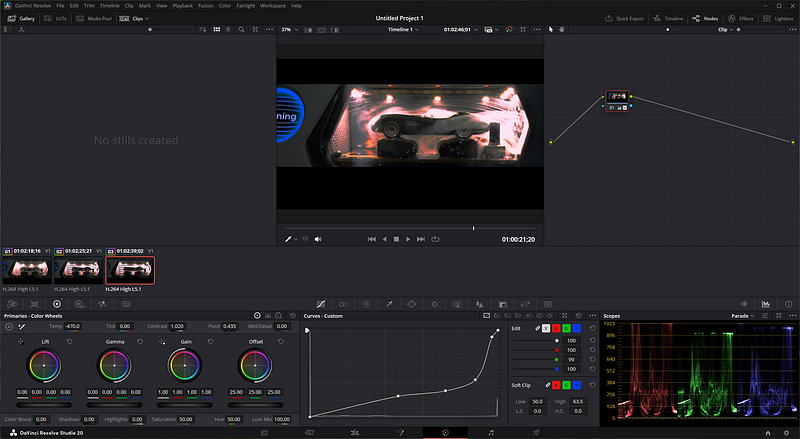
- 💻 DaVinci Resolve for video processing (the same tool used for editing Oppenheimer, Top Gun: Maverick, and Solo: A Star Wars Story)
- 📏 Calibration: ruler/marker in frame to convert pixels to measurement values (using https://turbulencerealm.com/)
- 🧮 Optical flow algorithms for vector extraction (using https://turbulencerealm.com/)
- 🔬 SINDy (Sparse Identification of Nonlinear Dynamics) for training and predictions (using https://turbulencerealm.com/)
Why small wind tunnels are awesome (even when they’re imperfect)
- 🚀 Rapid iteration: quick setups, instant visual feedback, and low risk if you mess up.
- 💸 Budget-friendly: simple smoke visualization and a consumer camera can go far.
- 🎥 Intuitive: smoke reveals separation, reattachment, shear layers, and wakes in a visceral way.
- 🧠 Teachable: perfect for building intuition before you chase coefficients or full-scale fidelity.
- ⚠️ Caveat: Great for qualitative insight, not absolute numbers.
The Process: From Visualization to Prediction
Stage 1: Flow Visualization
Placed the car in the tunnel and introduced smoke to make air currents visible. Rotating wheels added realism.
Stage 2: High-Quality Capture
Using my Sony A7III with manual focus, I recorded the smoke patterns as they flowed around the vehicle. The camera’s excellent low-light performance and resolution really helped capture the flow. For serious research, I’d recommend upgrading to professional high-speed monochrome cameras and lenses.
Stage 3: Video Processing
After capturing the footage, I imported it into DaVinci Resolve for processing. The software’s powerful color grading capabilities helped enhance the contrast between the smoke and background, making flow patterns more distinct.
Stage 4: Vector Extraction
Optical flow extracted velocity vectors — direction and magnitude of air movement around the car at each point.
Stage 5: Mathematical Modeling
SINDy identified the underlying equations governing the flow as a dynamical system, then made predictions about air behavior under different conditions.
Tip: Start with about 10 seconds of video (10 sec × 30 fps = 300 frames) for processing, depending on your computer’s memory.


What Stood Out
- 🌪️ Vortex formation and the expected flow physics around different parts of the car
- 💨 The rotating wheels created interesting effects
- 📊 SINDy successfully predicted flow patterns that matched visual observations (with errors)
- 🔍 Small-scale testing can reveal insights applicable to full-size vehicles
The beauty of this experiment is that it demonstrates how accessible advanced fluid dynamics testing has become — you don’t need a multi-million dollar facility to explore the basics of aerodynamics.
Try It Yourself
If you’re interested in trying similar experiments, you don’t need all the equipment I used. Start simple with a basic setup and a decent camera. The physics is fascinating at any level!
Final Thoughts
It’s a reminder that with today’s technology, the gap between professional research and hobbyist exploration continues to narrow. Whether you’re a seasoned engineer or just someone who loves tinkering, there’s never been a better time to explore the invisible forces that shape our world.